macOS
Overview
In this tutorial, we’ll learn how to generate a macOS code signing identity, which is required to distribute your application across MacOS and iOS devices.
We will specifically focus on generating a Developer ID Application identity, which is used to distribute a Mac application outside of the Mac App store. However, the procedure for creating all other types of identities is exactly the same. Once you familiarize yourself with the general process, you’ll be able to create identities required to upload applications to the Mac or iOS App stores without much trouble.
Getting the code signing identity will require five main steps, which you will be guided through in this tutorial:
Enrolling in the Apple Developer program
Generating a Certificate Signing Request on Keychain Access
Creating a Developer ID Application Certificate
Accessing the details of the Certificate on your Terminal
Anticipating potential issues with the identity in the future
Enrolling in the Apple Developer program
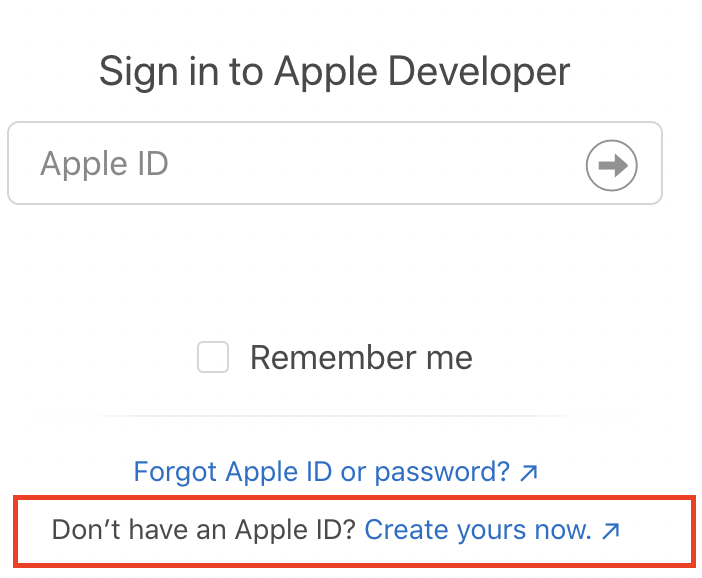
You can enrol in the Apple Developer program either as an individual, or as an organization. In both cases, you’ll have to follow the instructions on the Apple Developer website.
Once you click “Start Enrollment Now” at the bottom of the page, you can either sign in with your existing Apple ID or alternatively, create a new one:
As part of the registration procedure, you’ll have to pay a $99 fee, which will be charged on an annual basis.
Fee waivers
If you’re registering as a non-profit organization, an educational institution or a government entity, you may be eligible for a fee waiver, which you can read more about here.
Generating a certificate request on Keychain Access
Now that you’re set up with an Apple Developer ID, it’s time to create a certificate request, which you’ll then use to generate a valid Developer ID certificate.
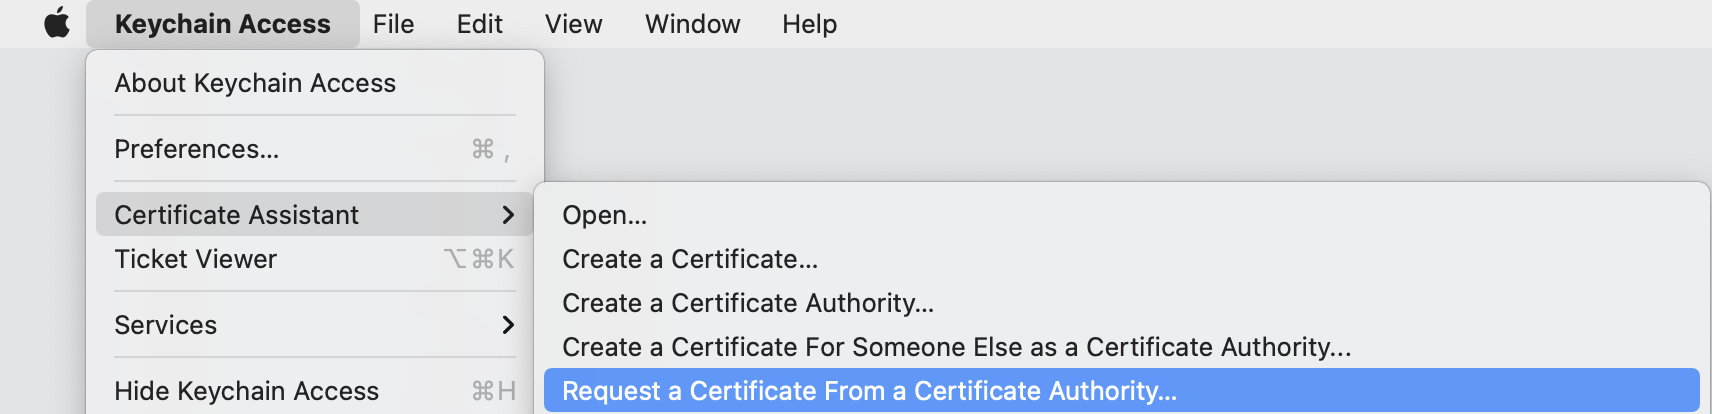
First, open the Keychain Access application on your Mac. At the top left of your
screen, click Keychain Access > Certificate Assistant > Request a
Certificate From a Certificate Authority:
A Certificate Assistant window should open up, looking similar to this one:
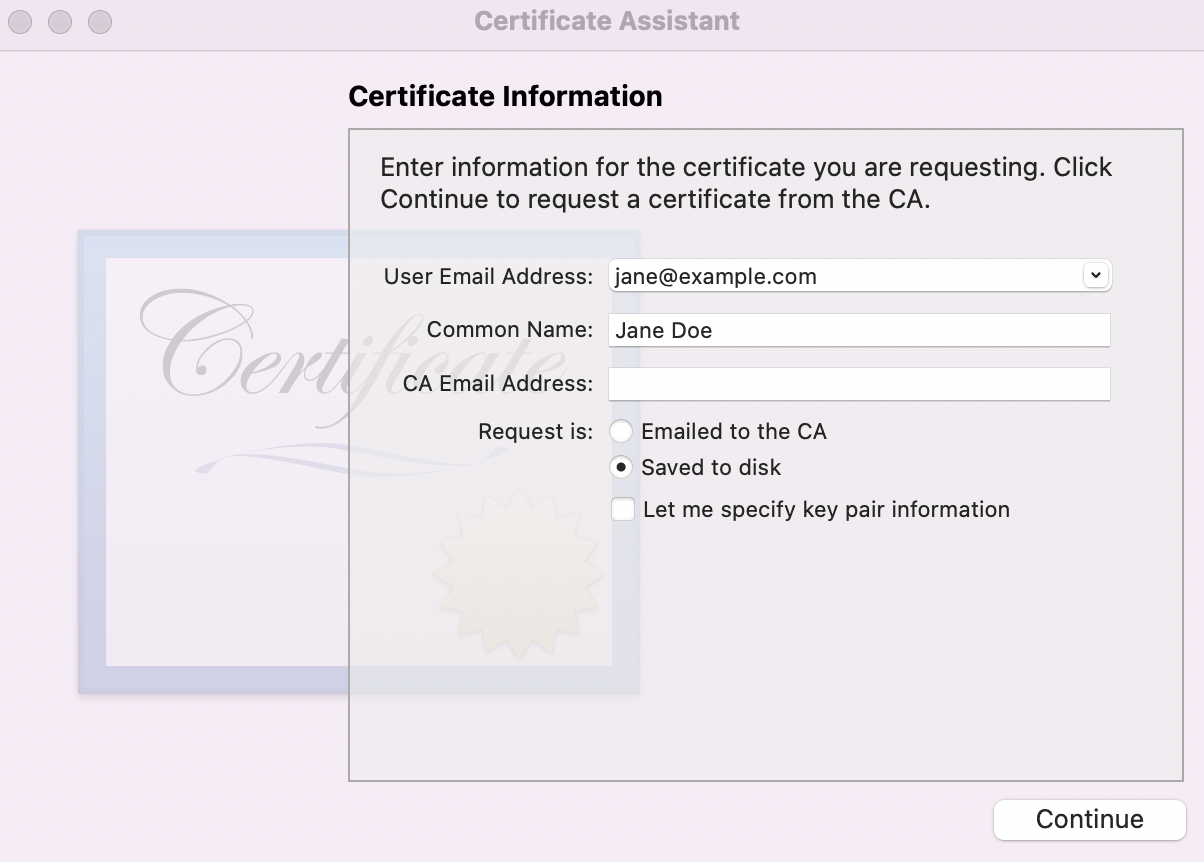
In the field
User Email Address, type the email address associated with your Apple Developer Account (e.g.jane@example.com).Common Nameshould refer to the name with which you registered to the Apple Developer program (e.g.Jane Doe).The field
CA Email Addresscan be left empty.Make sure that you choose
Saved to Diskin theRequest isfield.Click “Continue”, and save your Certificate Signing Request somewhere on your local machine. The saved certificate request should be of the format
example.certSigningRequest.
As documented by Apple, this procedure creates not only the file you have just saved, but also a private key in your Keychain, which will establish the validity of your actual Developer ID Application certificate later on.
Creating a Developer ID Application Certificate
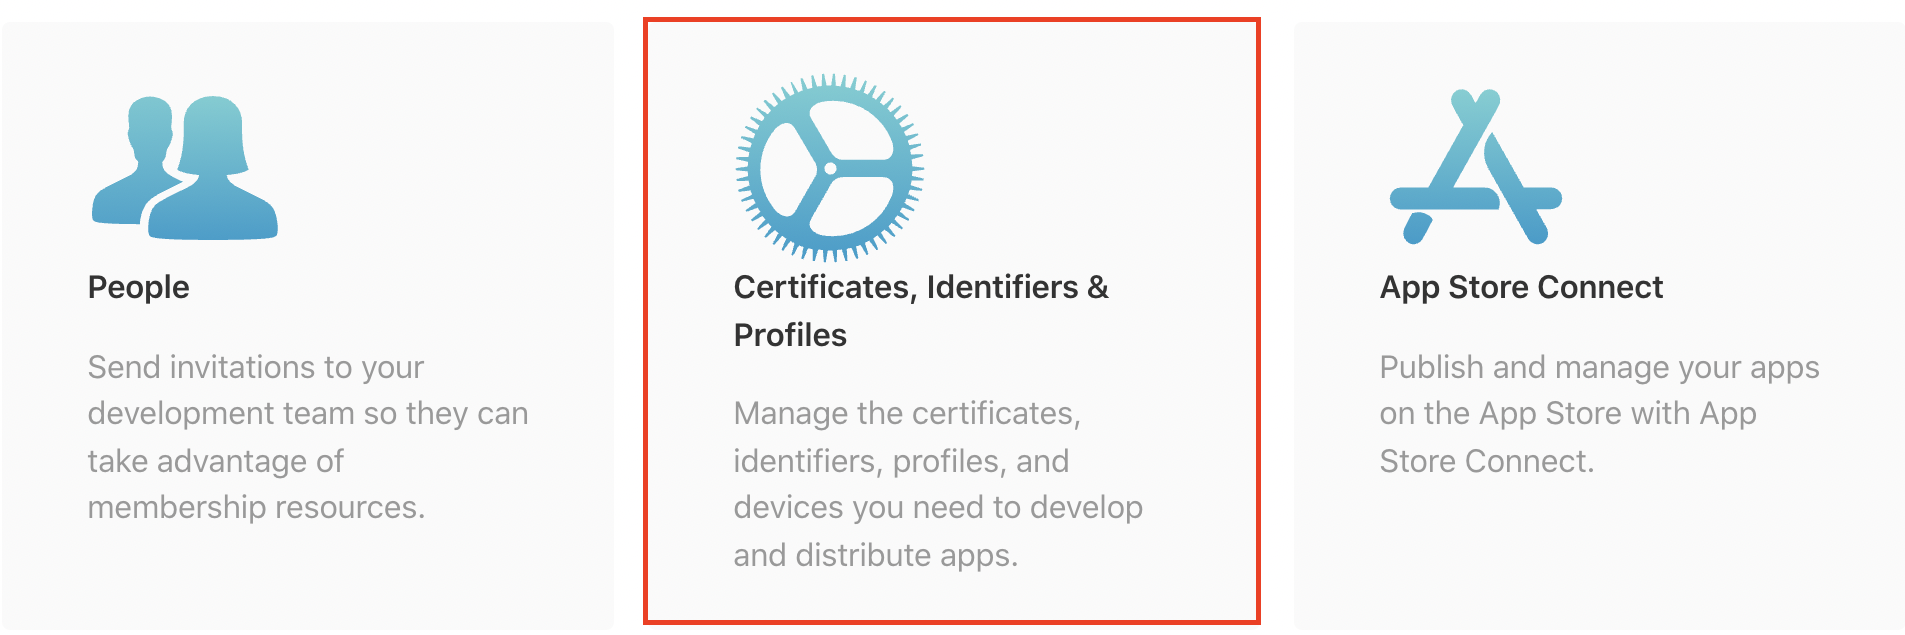
Once you have saved the certificate request, head to the Apple Developer website and click “Certificates, Identifiers and Profiles”:
When you land in the Certificates section, click the “+” symbol to create a new certificate:

In the next page, you’ll have to choose the type of certificate you want to generate. In the Software section, choose the option of “Developer ID Application”. It’s very important you choose the right type of certificate.
Later on, if you want to generate another code signing certificate for other purposes, such as uploading your application the App store, you’ll simply have to choose a different type of a certificate on this page.
Note: If you’ve been registered as an organization, there’s a chance that the option to choose the Developer ID Application certificate is unavailable. This may happen if you’re not assigned the role of the Account Holder. You can access and change these roles using App Store Connect.
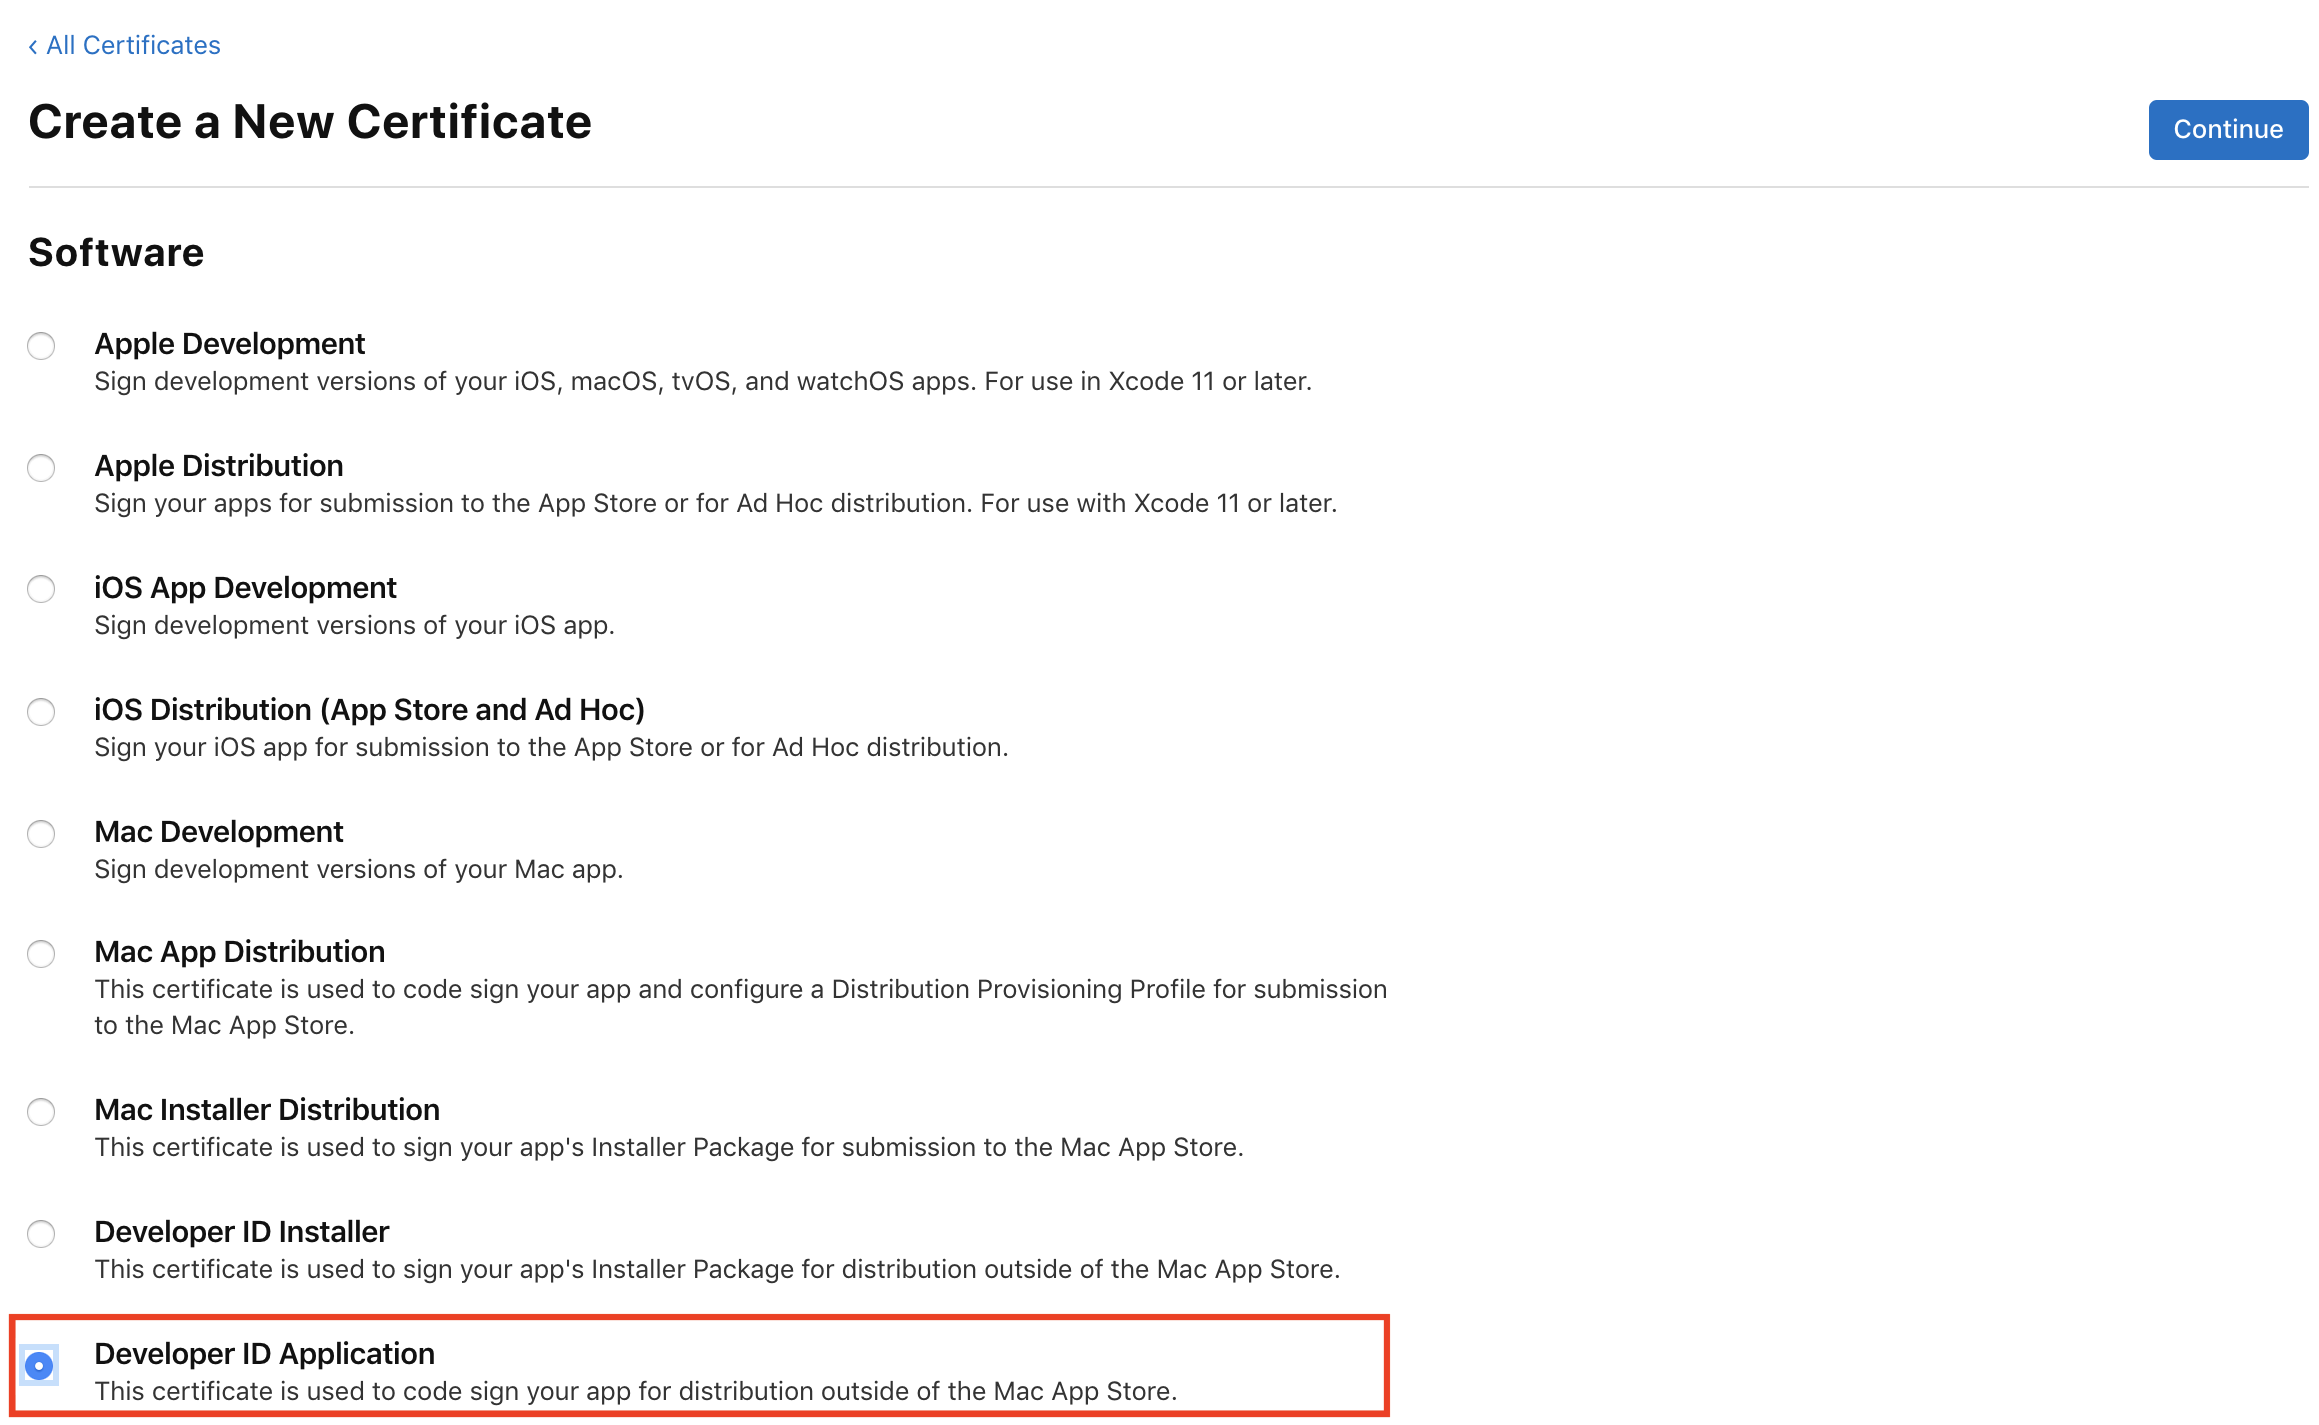
Click “Continue”. In the next window, click “Choose file” and upload the Certificate Signing Request you have just generated on your Keychain:

Once you click “Continue”, Apple will generate your Developer ID Application Certificate. Click the “Download” button and save the certificate on your local machine:

The certificate should be of the format example.cer. Once you download it,
double-click to install it in your Keychain Access.
Then open your Keychain, make sure you’re in the login directy on the
left-hand side, and open the window My Certificates. You should see a
certificate whose title starts with “Developer ID Application…”.
Click on the certificate and make sure you see a note that reads This
certificate is valid. Note: In the example below, the certificate details
have been erased:
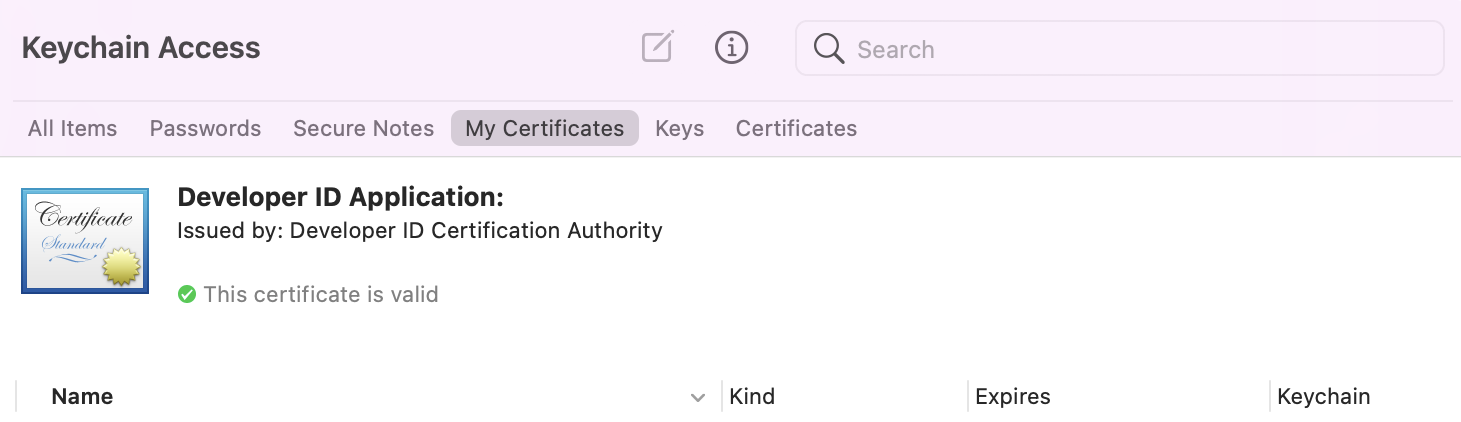
Congratulations! You’ve just successfully installed the Developer ID Application certificate.
Accessing the details of the Certificate on your Terminal
Finally, open your Terminal. You’ll have to run a command that will fetch detailed information about all valid certificates for code signing on your local machine, including the Developer ID Application Certificate you have just created:
$ security find-identity -p basic -v
The important part of the output is the following:
<Certificate ID> "Developer ID Application: <Name> (<Team ID>)"
e.g:
A1B2C3D4E5F6G7H8I9J10K11L12M13N14O15P16R "Developer ID Application: Jane Doe (ABCD123456)"
You’ll need to keep note of two things:
Certificate ID: This should be a 40-unit string, which in the example is:
A1B2C3D4E5F6G7H8I9J10K11L12M13N14O15P16RTeam ID: Will usually be a 10-unit string. Here, it’s:
ABCD123456.
Anticipating potential issues with the identity in the future
It’s also useful to keep in mind two potential issues related to MacOS code signing identities.
First, the specific type of the certificate you have just created is quite precious, and you should make sure to keep it safe. A single Developer ID Application Certificate can be used to sign, notarize and distribute multiple applications outside of the Mac App store, which is why a very limited number of them can be created on a particular Developer Account. You should consider making a back up copy, which will require you to export the certificate together with the associated private key from the Keychain. The procedure for doing so is documented by Apple.
If you intend to create other types of code signing identities in the future, it’s also helpful to discuss Apple’s Worldwide Developer Relations (WWDR) Intermediate Certificate. While we didn’t need to use it to create the Developer ID Application identity, you’ll need to have a WWDR certificate in your Keychain to create valid code signing identities for other purposes, such as testing your applications with the “Mac Development” certificate or uploading them to the App store with the “Mac App Distribution” certificate.
The WWDR certificate should be automatically installed in your Keychain with Xcode 11.4.1 or later. You should verify this by opening your Keychain, making sure you’re in the
logindirectory on the left-hand side, and navigating to the windowMy Certificates. You should see a certificate calledApple Worldwide Developer Relations Certification Authoritywhose expiration date is set to 2030: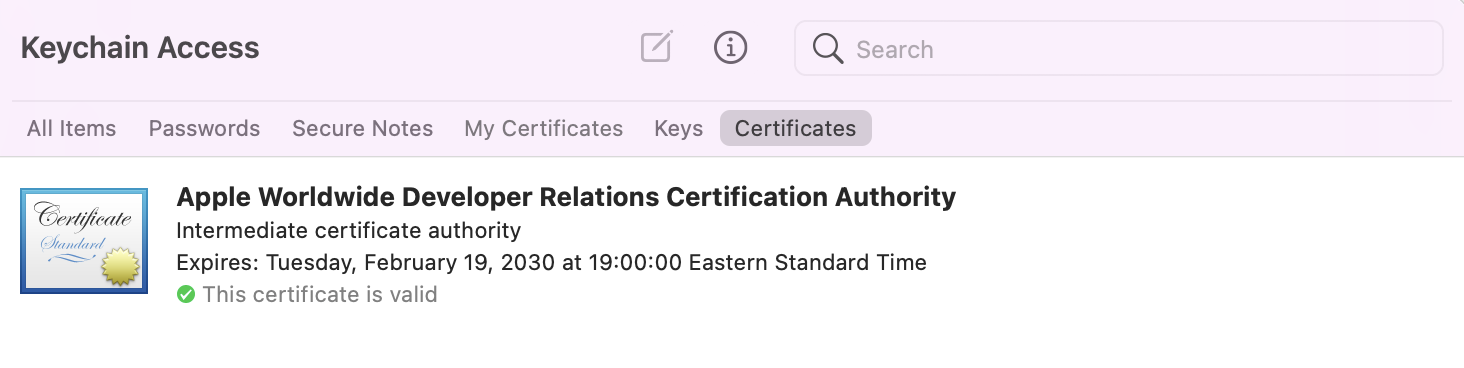
If you can’t find this certificate in the Keychain, you can download it by following the instructions on the Apple Developer website. Alhough Apple’s documentation may change in the future, the instructions are currently displayed under the
Taking Actionsection. There, you will find a link to download the certificate directly or through Apple’s Certificate Authority page. Once you download it, make sure to install it in your Keychain.
Next steps
Now it’s time to start using the Developer ID Application Certificate to sign, notarize, and distribute your application!